At the time of writing, this new protocol is only supported by MacOS Ventura, iOS 16, and iPad 16.
What are Privacy Access Tokens?
Private Access Tokens (PATs) are being touted as an end to CAPTCHAs. PATs aren't mature enough yet for web users to see CAPTCHAs disappearing but it is an exciting time for privacy and security.
PATs benefits include privacy protection, fraud prevention, and major user experience improvement.
With PATs, an app or website can confirm that the user is a real human and not a bot or other malicious actor. Without linking your identity to your activity! And without you having to click any extra buttons or type any hard-to-read letters!
This is a big reduction in general internet annoyance and is also a huge accessibility win! CAPTCHAs are notoriously inaccessible.
PATs are an extension to the relatively new Privacy Pass protocol.
How it works: high level
Thank you to Fastly for this simple, yet complete diagram of how PATs work in practice. To read the full explanation, please check out their blog post.
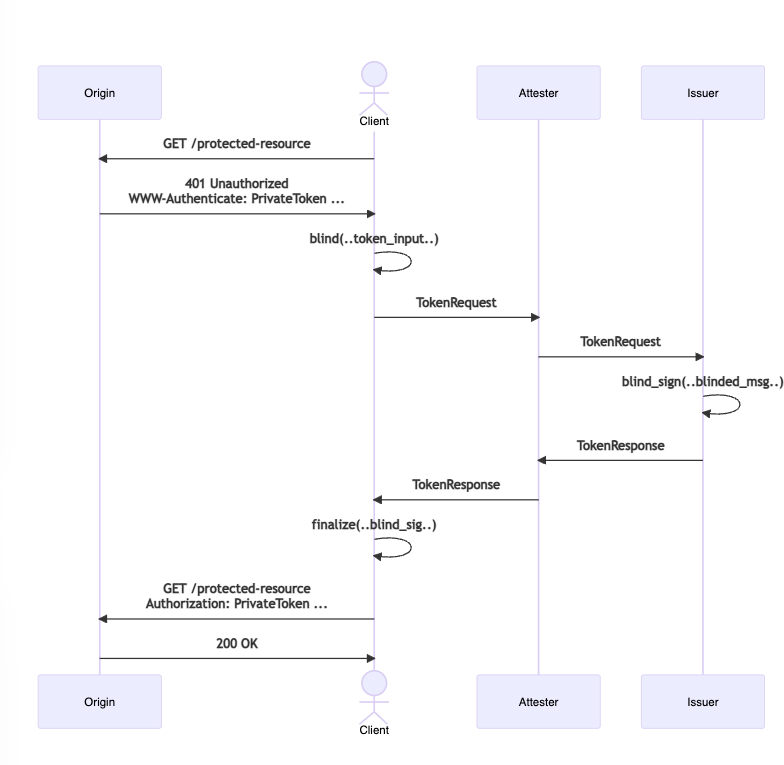
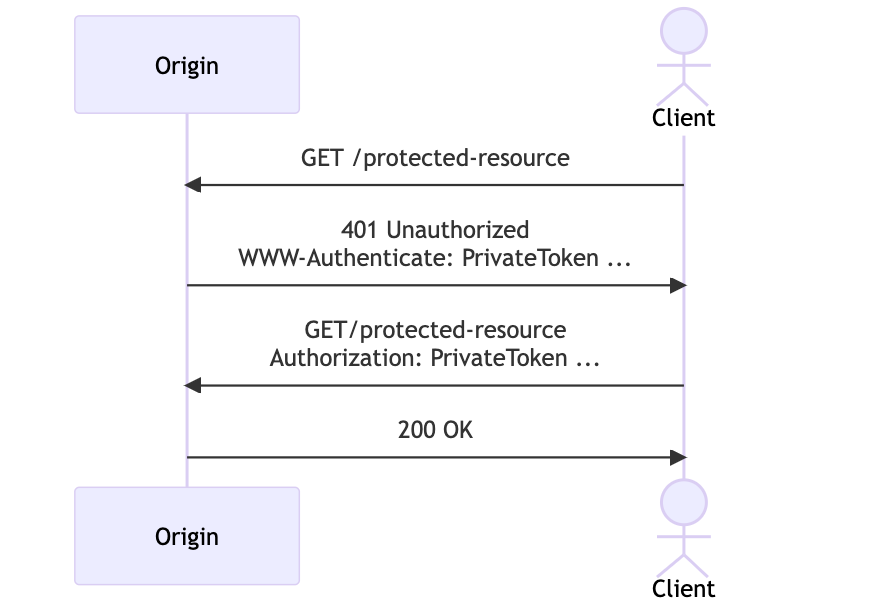
If you are a web or app developer, you only need to worry about the Origin and Client entities in the above diagram. Your app is the Origin and the user's device or browser is the Client.
When you're updating your code to support PATs, the flow looks more like this.
Simple, right!?
Updating your web server to support PATs
At the moment, there isn't a lot of documentation out there on how to support PATs as an origin server. I.e. how do I update my app or web server to accept PATs?
The current IETF spec is detailed and very helpful but it is dense and a bit hard to understand if you're not used to reading docs like this. I'll try to break down the implementation details so they're easy to understand.
Before you begin, you'll need to choose which issuer you want to use. Cloudflare and Fastly are both issuers. You'll need the issuer name and the base64url encoded issuer public key.
You can find a full working Rails example in my demo repo. Reference it directly or use it as you follow along with the explainer below.
Challenge presentation
The first step to support PATs is for your server to present a valid token challenge to the client.
To send a token challenge, your server needs to respond to a request for a protected resource with an HTTP 401 status and a WWW-Authenticate header.
The WWW-Authenticate header contains 2 attributes: the challenge and the token key.
The challenge is a base64url encoded string.
The expected format for the challenge is defined as follows.
struct {
    uint16_t token_type;               // 0x0002, in network-byte order
    uint16_t issuer_name_length;       // Issuer name length, in network-byte order
    char issuer_name[];                // Hostname of the token issuer
    uint8_t redemption_context_length; // Redemption context length (0 or 32)
    uint8_t redemption_context[];      // Redemption context, either 0 or 32 bytes
    uint16_t origin_info_length;       // Origin info length, in network-byte order
    char origin_info[];                // Hostname of your server
} TokenChallenge;
This is a C struct, but most of us aren't coding with C in our daily lives. So what does this mean???
You need to incrementally build a character string following the order of the elements in the struct and then base64url encode it1.
In Ruby, you can use pack for this. In Node.js, you can use a Buffer. In Python, you can use a struct.
All of these have helpers for you to specify the directive to pack the bytes to the correct byte order (in this case network byte order, which is big-endian2).
1. Build the token type
The token type is a constant. At the moment, Apple only supports token type 2, which uses publicly verifiable RSA Blind Signatures.
You need to convert 2 to an unsigned 16-bit int3 (example).
Your expected output is "\x00\x02".
2. Build the issuer name length
Get the length of your issuer name (this should be a constant depending on which issuer you chose). For example, demo-issuer.private-access-tokens.fastly.com has a length of 44.
Convert the length of the name of your issuer to an unsigned 16-bit int (example).
For a length of 44, your expected output is "\x00,".
3. Include your issuer name
No packing needed! Include the name of your issuer as-is. For example, demo-issuer.private-access-tokens.fastly.com.
4. Build your redemption context length
Redemption context is optional in the struct, but the length is not. If you choose to include a redemption context it needs to be 32 bytes long.
So you need to convert either 0 or 32 to an unsigned 8-bit int (example).
For 0, your expected output is "\x00". For 32, your expected output is " ".
5. Build your redemption context
If you want to limit who and when someone can redeem a token, you'll want to create a redemption context.
This value can be a unique per-request nonce using 32 random bytes. Or it can also represent the state or properties of the client session such as a time window. For more details, see the spec.
I like to use unique redemption contexts so that a token can only be redeemed a single time.
You need to convert 32 random bytes to an unsigned 8-bit int (example).
For example "0304533fa35353f4e2a0ba6b9fc0d9e4" is a random 32-byte string.
6. Build your origin info length
Origin info is optional in the struct, but it's a good idea to include the length. If you choose to include origin info, you'll find the length the same way as you did for the issuer name.
Convert the length of your origin name to an unsigned 16-bit int.
7. Build your origin info
Origin info is an optional string containing one or more origin host names. If you support multiple hosts, you'll comma separate the host names without a space, e.g. host.com,names.com,like.org,this.co) (for more info, see the spec).
If you include your origin info, you'll include it as-is the same way you did your issuer name.
8. Put it all together
Finally, create a string with all of your info concatenated.
"[token_type][issuer_name_length][issuer_name][redemption_context_length][redemption_context][origin_info_length][origin_info_length]"
From the examples above — which include a redemption context but no origin info — we have
"\x00\x02\x00,demo-issuer.private-access-tokens.fastly.com 0304533fa35353f4e2a0ba6b9fc0d9e4\x00"
And this is what you base64url encode to include as the challenge in your response header.
"PrivateToken challenge=AAIALGRlbW8taXNzdWVyLnByaXZhdGUtYWNjZXNzLXRva2Vucy5mYXN0bHkuY29tIDAzMDQ1MzNmYTM1MzUzZjRlMmEwYmE2YjlmYzBkOWU0AA==, token-key=[base64url encoded issuer public key]"
Token redemption
The second step to supporting PATs is for your server to successfully redeem a PAT from the issuer.
To redeem a token, your server needs to read the token from the Authorization header provided by the client. The token is the only attribute included in the Authorization header.
The token is a base64url encoded string.
The expected format for the challenge is defined as follows.
struct {
    uint16_t token_type = 0x0002
    uint8_t nonce[32];
    uint8_t challenge_digest[32];
    uint8_t token_key_id[32];
    uint8_t authenticator[Nk];
} Token;
* the current length of Nk is 512 for token type 2
We have another C struct! But this time we aren't building the struct. We need to disassemble, read, and validate the data before allowing the user access to the protected resource.
This process is kind of the reverse of what we did to create the challenge. Start by base64url decoding the string.
1. Validate the token length
The token should always be the same length. If you are checking the length of the packed data, it'll be 610 bytes. If you are checking the length of the unpacked data, it'll be 609 bytes (because of that singular 16-bit int).
If the token is not the correct length, you should not want to redeem this token (example).
2. Validate the token type
Unpack the first 2 bytes of the string from an unsigned 16-bit int.
Verify that the token type is 2. Any other token type is invalid currently and the token should not be redeemed (example).
3. Validate redemption context (optional)
If you chose to include a redemption context in your challenge, you'll want to validate that now.
The challenge_digest is a 32-byte SHA256 hash of the token challenge that the issuer received. To validate, you'll want to fetch or recreate the token challenge you issued, hash it and make sure that the 2 hashes match.
As I said above, I like to include a unique nonce that only allows a single token redemption. I cache the hashed challenge token in the session before I present it and then check that cached value with the challenge_digest. If they match, I remove it from my cache (example).
4. Verify the signed token
Finally, the last step is to use your Issuer public key to verify the authenticator. The authenticator should be the signature of signing the token type, nonce, challenge digest, and token key id (example).
Depending on your server language, you may need to put the public key into PEM format before verifying.
If all of your validations and verifications succeed, you can redeem the token and grant your user access to your protected resource! That's it!
I hope this explanation was helpful. This is a new protocol and there aren't very many easy-to-understand resources out there yet. If you have any questions or feedback to make this post clearer, please reach out!
Troubleshooting
When updating your server and debugging your code, I highly recommend using your browser's dev tools and keeping the network tab open.
Below I've outlined some of the things that tripped me up the first time I implemented PAT support on a web server.
I see my 401 response being served, but I never get the following request with the Authorization header from the client
Are you using an OS that supports PATs? As of 2023, only MacOS Ventura, iOS 16, and iPad 16 support this protocol.
Are you using a supported browser? In my testing, Safari is the only browser I've been successful with.
I don't see any 401 response! I only see a 200 response to a request with the Authorization header from the client
Yay! That is the expected behavior when you have the challenge presentation and token redemption working.
Footnotes
1. The Issuer is going to read your token request as a stream of data. Since some of the included information is variable length, it is important to include the lengths of those parts.
The Issuer will read the first 2 bits as the token type. Then it will read the next 2 bits as the length of the issuer name, and use that number to read n number of bytes for the issuer name. Then read the next 2 bits as the length of the redemption context and so on.
2. Endianness refers to what order computers read and write bytes in. Most PCs are little-endian while most network protocols expect big-endian. You do not need to understand Endianness to successfully implement PAT support. But if you'd like to learn more freeCodeCamp has a decent explainer.
3. C data types can be confusing if you're not used to working with them. 8 bit vs 16 bit refers to the literal storage size of the data. The more bits you have, the bigger number (and corresponding character code) you can represent. Wikipedia has a list of C data types.
Further reading
Find related posts:How-to guides