There is always a big debate around if you should rewrite your Git history. People who are anti-rewrite argue that your Git history should be a source of truth and tell you exactly what happened, even if the history is messy. People who are pro-rewrite prefer a clean, understandable history over the absolute true history.
I fall somewhere in the middle. I believe in "green" (i.e. passing linting, tests, and other CI tools), atomic commits. I want future devs to be able to check out any commit of mine and it "just works." But I'm also human and my brain doesn't work linearly. Each commit I make while in active development is not perfectly atomic. My compromise is that I am very pro rewriting local Git history and very anti rewriting remote Git history.
I liberally rewrite my local commits in my local branches to get the history green, atomic, and readable before I push up to the remote. Once it's pushed up, I try very hard to never rewrite the remote's history (although there are always exceptions to the rule 😉)
Anti rewriting history
- The history is a source of truth and represents exactly what changed and when
- You preserve all attempts to get something working and have that history to refer back to
- A messy history can make rolling back to a specific commit a bit more challenging if that commit isn't "green"
Pro rewriting history
- Easy to create "green", atomic commits that represent a more linear development process
- The history is easy to understand and easy to use as developer documentation
- Rewriting history means you may lose some attempts that didn't work and won't be able to reference those in the future
Below I outline some of my favorite strategies for rewriting my local Git history. This post assumes familiarity with the basic Git CLI commands.
Before a change is committed
git add -p
A variant on the git add command that we all use every day, the -p means "patch" and lets you stage your diff in chunks (I call them chunks, Git calls them hunks).
When using the -p flag, Git gives you a prompt with a variety of options
Stage this hunk [y,n,q,a,d,/,j,J,g,e,?]?To see what any of the options means, use the ? which will print out an explanation of the options.
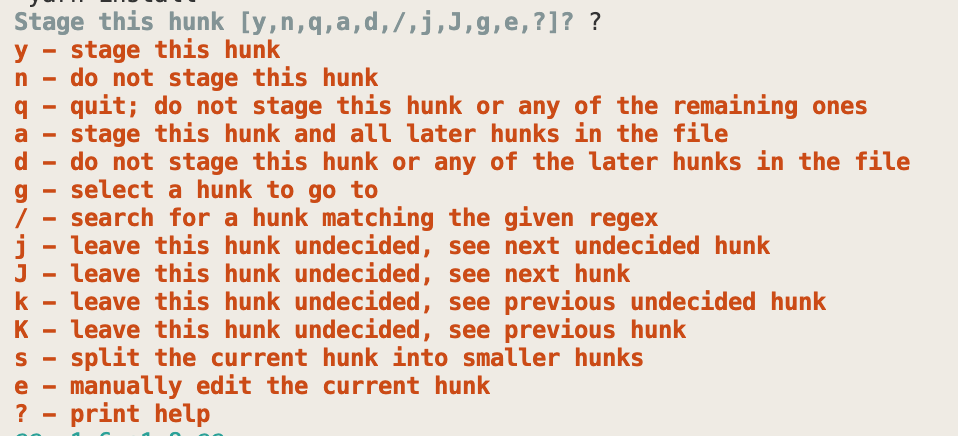
As you go through your diff, you can choose to add or not add different changes so that your commit is only a subset of the changes in your working directory.
git reset -p
reset is a powerful command that is used to undo local changes, both staged and/or committed depending on how it's invoked. It can seem scary to undo changes, but with practice, it's a really handy command.
git reset -p is the inverse of git add -p. If you accidentally did a git add . and want to unstage just some of it, you can reset in chunks.
Since you're using the -p flag, you can use the ? option to see an explanation of what each of the options does while you're resetting.
git checkout -p
If you want to get rid of a subset of your changes completely, you can also check out your changes using the -p flag.
git stash save 'msg'
The Git stash is a wonderful little place to put your changes temporarily.
To put everything you currently have in your stash, all you need is git stash. However, I think it's helpful to include a message so that you have a description of what's stashed in case it stays there longer than you expect. For that, use git stash save 'msg' where you provide a brief description, just like when you make a commit.
git stash will stash everything regardless of its staged/unstaged state (unless the file is also untracked, untracked files are ignored). Then you can use git stash pop or git stash apply to apply the changes to your working directory.
git stash pop applies your changes to your working directory and removes the changes from your stash (literally popping it off the stack), while git stash apply applies them to your working directory but keeps them in your stash (just in case).
When you stash and pop/apply, the files' staged/unstaged status is not preserved.
git stash save -k
To stash only your unstaged changes, i.e. the things you haven't git add, then you want to use the -k flag which stands for --keep-index.
With the -k flag, changes that you have staged (git add) will remain in your staging area and changes that you have not staged will be added to your stash.
git stash save -u
To stash untracked files as well, you use the -u flag, which stands for --include-untracked.
When using git stash save -u all of your changes will be stashed. The -u flag changes the default behavior and tells Git to stash all changes including the untracked files that are ignored by default.
git stash save -k -u
To stash only your untracked files, you can combine the -k and -u flags for git stash save -k -u.
If you have some untracked files that you don't want to delete but don't want to sneak into a commit on accident, you may want to stash only your untracked files.
After a change is committed
git commit --amend
git commit --amend is my most used command to rewrite local history. This command allows you to add files to your previous commit or edit the commit message.
Simply git add whatever changes you want to add to your previous commit and then run git commit --amend.
git reset HEAD~1
If you committed too much and you want to back out a file, you can soft reset the last commit (locally), change what's staged using git reset -p, and then re-commit. If you want to reset more than 1 commit, you can change the number after the tilde to how many you want to undo.
This will only undo the commit not the changes, so you'll have all of your changes in your staging area.
git cherry-pick SHA
If you made a commit in the wrong branch, you can cherry-pick it into your correct branch before you reset/revert/undo it in some way in the wrong branch.
When I'm on the wrong branch, I use git log --oneline to see the commit SHAs and copy the one I want to cherry-pick. Then check out the correct branch and git cherry-pick SHA. It's important to remember that you want to run the cherry-pick command from the branch you want to apply the commit to.
git checkout branch-name -- <filename>
If you don't need a full commit from a different branch and just want one file, you can checkout just that file from another branch into your current branch.
git rebase -i HEAD~4
Interactive rebase is incredibly powerful for editing your commit history but you should definitely only do this locally (before you push anything!).
You can change the order of commits, add files to a commit made multiple commits ago, combine commits, and remove commits (as well as probably a whole host of other things that I haven't tried yet).
The nice thing about interactive rebase is that its interface provides instructions on exactly how to use it.
And just like the git reset command above, the number after the tilde is how many commits you'd like to run this command on. If you want to edit the last 4 commits, then you use 4 but if you want to edit the last 10, then you'd use 10.
git push --force-with-lease
Finally, if you interactive rebase on a shared project (one where you aren't the only contributor), using --force-with-lease makes sure that you don't accidentally hose someone else's local repo. Your force push won't succeed if someone else has pushed up changes that your force push would overwrite.
I don't recommend interactive rebasing commits that have already been pushed to your remote for this reason. But if you do, --force-with-lease can save you and your team a lot of accidental headaches.
Find related posts:Developer workflowTips & tricks